Understanding Time Lapse Recording
Time lapse recording is a specialized technique in videography and photography that involves capturing a series of images at set intervals over an extended period. When these images are played back at normal speed, it creates a fast-moving sequence that reveals processes unfolding over hours, days, or even months within a matter of minutes. This method offers viewers a unique perspective on changes that are often imperceptible to the human eye during regular observation.
At its core, time lapse recording emphasizes deliberate control over timing, frame rate, and interval settings, allowing for a highly customizable approach tailored to the subject and desired outcome. Whether depicting the bustling activity of city streets from dawn to dusk, showcasing the rapid growth of a plant, or documenting architectural construction, this technique provides a compelling visual narrative that enhances storytelling through visual impact.
Key features of time lapse recordings include the ability to condense lengthy processes into digestible visual segments, improve the viewer's understanding of dynamic changes, and add a dramatic or artistic element to visual projects. Its versatility is evident across a wide range of industries, from filmmaking, where it can be used to showcase the passage of time in a scene, to real estate marketing, emphasizing construction progress, or scientific documentation, capturing environmental phenomena like weather changes or geological activity.
Understanding the fundamentals of time lapse recording is essential for those interested in advanced photographic techniques. It involves meticulous planning, careful equipment selection, and precise execution to produce high-quality footage that is visually pleasing and effectively communicates the intended message. As technology continues to evolve, dedicated time lapse accessories and software have also emerged, further expanding its creative possibilities and applications.
To achieve professional results, practitioners should familiarize themselves with the specific features of their equipment, such as intervalometers, stabilized mounts, and camera settings optimized for capturing images over long durations. Proper planning and execution not only ensure the clarity and consistency of footage but also help in managing storage and battery life during extended shooting sessions.
Overall, mastering time lapse recording opens up numerous opportunities for creative expression, innovative storytelling, and impactful documentation. By understanding its core principles and effective use of equipment, content creators can produce engaging videos that beautifully illustrate the passage of time and the subtle transformations that shape our environment.
Configuring Camera Settings for Time Lapse
Optimizing camera settings is crucial for achieving compelling time lapse recordings. Selecting the appropriate aperture, shutter speed, ISO, and focus ensures sharp images and consistent exposure throughout the sequence. For static scenes, a narrow aperture (higher f-stop number) helps maintain depth of field, keeping elements in focus over time. Shutter speed should be set to balance motion blur and clarity; typically, a slower shutter speed captures smoother motion, especially in low-light conditions, while faster speeds prevent motion artifacts during rapid movement.
ISO settings must be carefully chosen to minimize noise while capturing enough light, particularly during evening or low-light scenarios. Maintaining a consistent ISO throughout the shooting duration helps prevent flickering in the final footage. Focus should be manually set and locked in place to prevent focus drift, which can occur with autofocus adjustments. Using manual focus also ensures the scene remains sharp and consistent over extended periods.
Other important considerations include setting the camera to shoot in RAW format if possible, as this retains maximum image detail for post-processing. Additionally, utilizing long exposure settings can smooth out motion and contribute to visually appealing sequences, especially for night scenes or water movements. Confirm that the camera's interval timer or external intervalometer is correctly configured to match your desired frame rate, ensuring that images are captured at precise intervals for fluid motion in the final video.
Capturing and Managing Time Lapse Footage
During the shooting process, consistency is key. Regularly monitoring the camera and scene can help identify issues like battery drain or unexpected environmental changes. Employing weatherproof covers or stable mounts prevents equipment from shifting or damage during prolonged sessions. It's essential to plan for sufficient storage capacity, as high-resolution images and extended sequences can quickly fill data cards or external drives.
Effective data management involves organizing images with clear labeling or timestamping. This practice simplifies post-processing and ensures that sequences are assembled correctly. Additionally, maintaining a log of camera settings, environmental conditions, and shooting intervals can inform future projects and help troubleshoot if inconsistencies arise.
Extending battery life through portable power solutions, or swapping batteries during long sessions, helps avoid interruptions. In some setups, applying continuous power supplies or external chargers can be advantageous for uninterrupted recording. Weather conditions can influence the quality and continuity of footage—adaptive strategies such as protective casings or tenting equipment can shield the camera from rain, dust, or extreme temperatures.
Post-Processing and Editing Time Lapse Videos
Once capturing concludes, the focus shifts to assembling and refining the footage. Digital editing software allows for the adjustment of frame rates, color correction, and stabilization to produce a polished final product. Importing images into dedicated time lapse software or video editors enables sequencing, speed adjustments, and transitions, enhancing the visual storytelling impact.
Stabilization is often necessary to counteract slight camera movements or vibrations during shooting. Applying subtle optical or digital stabilization during editing can dramatically improve the viewing experience. Color grading adjusts hues, brightness, and contrast, emphasizing the mood or themes conveyed by the sequence.
Finally, exporting the finished video in the appropriate format and resolution ensures compatibility with various presentation platforms. The result is a seamless time lapse video that vividly captures the passage of time, whether for artistic expression, environmental monitoring, or event documentation.
Official Techniques for Capturing Time Lapse Recordings
To achieve compelling and professional-grade time lapse recordings, it is essential to employ methods that ensure consistent, high-quality footage. When capturing time lapse sequences, utilizing official camera settings and features designed specifically for this purpose can significantly enhance the outcome. Modern cameras and dedicated time lapse devices often include built-in intervalometers, which automate the capturing process based on pre-set intervals, ensuring precise timing between frames.
Adjusting camera parameters appropriately before starting the recording session is a critical step. This involves setting a suitable interval between shots, determined by the speed of the subject or scene's change rate. For instance, a scene with rapid motion, like traffic or crowds, may require shorter intervals, whereas slow-moving scenes, such as sunsets or plant growth, can be captured with longer intervals. Correctly configuring exposure, focus, and white balance guarantees consistency across all frames, preventing distracting flickering or exposure shifts during playback.
When selecting official recording methods, it's imperative to use cameras capable of maintaining stable settings throughout long shooting durations. Devices with reliable hardware and software for continuous operation minimize the risk of frame loss or exposure variations. For extended time lapses, employing external power sources or backup batteries is advisable to sustain uninterrupted operation.
Moreover, adhering to rigorous data management protocols is vital. This includes regularly backing up images or footage during shooting to prevent data loss and ensuring storage devices are free from errors. Using high-quality memory cards with fast write speeds supports smooth data recording, especially when capturing high-resolution images or videos.
For outdoor shoots, protecting equipment against environmental elements is crucial. Weatherproof casings or enclosures help safeguard delicate electronics from rain, dust, or wind. Employing remote monitoring and control tools allows operators to adjust camera settings remotely, reducing the need for physical access and minimizing disturbances during the recording process.
Ensuring Proper Management of the Captured Footage
Post-capture management of time lapse footage involves meticulous planning and organization. Transferring the images or video files to a dedicated workstation equipped with high-performance editing software ensures a streamlined workflow. Organizing files with logical naming conventions and metadata facilitates efficient editing and review processes.
During the review stage, inspecting each frame for artifacts or inconsistencies aids in identifying and addressing any issues early. Applying necessary corrections, such as removing duplicate or defective frames, enhances the final quality of the sequence. When assembling the footage, it is advisable to set consistent frame rates and export settings that match the intended presentation platform for the best visual fidelity.
In professional settings, maintaining detailed logs of shot parameters and conditions can be advantageous for future reference or replication. Collaborating with post-production specialists or utilizing advanced editing tools enables artists and documentarians to craft visually stunning time lapse sequences that effectively communicate the passage of time and the essence of the scene captured.
Choosing the Right Camera Settings for Perfect Time Lapse Capture
Executing a successful time lapse recording hinges on precise camera configuration tailored to the scene’s dynamics and lighting conditions. The selection of interval timing, exposure, focus, and frame rate directly impacts the visual flow and clarity of the final video.
- Interval Timing: Determining the appropriate interval between shots is crucial. For capturing slow movements like sunrise or cloud formations, intervals ranging from one to five seconds are typical. For faster activities such as bustling city streets or moving crowds, shorter intervals in the range of half a second to one second can better capture motion without causing choppiness.
- Exposure Settings: Manual control over exposure is essential to maintain consistency throughout the recording. Adjust ISO, aperture, and shutter speed based on ambient lighting. For daytime scenes, a lower ISO and narrow aperture can prevent overexposure, whereas low-light conditions may require wider apertures and higher ISO settings, always balanced to minimize noise.
- Focus Configuration: Shifting focus during filming can disrupt the continuity of the time lapse. It’s recommended to switch the camera to manual focus mode and pre-focus on the subject or scene. Using focus peaking or focus stacking devices can aid in ensuring sharpness across the entire scene.
- Frame Rate and Resolution: Selecting a higher resolution, such as 4K, preserves detail for large displays or professional projects. The frame rate for playback typically ranges from 24 to 30 frames per second, with the understanding that the camera's interval and frame rate combine to determine the speed of the final sequence.
Applying these settings meticulously will help in capturing a seamless and visually compelling time lapse. Notably, consistent white balance is critical to avoid color flickering, which can detract from the professionalism of the footage. Using a dedicated time lapse camera or adjusting settings remotely ensures stability and reduces the risk of disturbances during the shoot.
Furthermore, it’s advantageous to conduct trial captures to assess how settings influence the final output before beginning extended recordings. This proactive approach minimizes errors and ensures the imagery aligns with the project’s vision.
Capturing and Managing Time Lapse Footage
Effective management of your time lapse recording process is crucial for producing high-quality results. When capturing extended sequences, it's essential to plan your workflow carefully to avoid interruptions and data loss. Use a reliable power source or multiple fully charged batteries to ensure continuous recording, especially during long sessions. Additionally, consider the storage solution—using high-capacity, high-speed SD cards or external drives protects your footage and allows for smooth data transfer.
To maintain consistent image quality throughout the shoot, it’s advisable to regularly inspect your camera’s settings. Avoid manual adjustments during recording, as changes in exposure or focus can cause noticeable inconsistencies. Employing custom white balance settings helps ensure uniform color rendering, prompting smoother transitions when you compile the images into a sequence.
Organizing your captured images systematically eases the post-processing phase. Implement a logical file naming convention and store your footage in dedicated folders to streamline editing workflows. Utilizing tethered shooting or remote camera control apps can further enhance your ability to monitor and adjust settings remotely, reducing the risk of accidental disturbances.
During the shoot, keep environmental factors in mind—vibrations, wind, or changing light conditions can impact image stability or exposure. Employ stabilization equipment such as tripods with fluid heads or vibration dampers to keep your camera steady. Additionally, employing an intervalometer with customizable settings allows precise control over capture intervals, critical for achieving the desired time lapse effect.
Post-shoot, review your images for consistency and quality. Discard any frames affected by technical issues like focus errors or exposure inconsistencies. Creating a backup of your raw images is a good practice, safeguarding your project from data loss. When ready for editing, importing the sequence into specialized software allows you to adjust timing, stabilize footage, and enhance overall visual appeal.
Managing your time lapse footage diligently from capture through to editing is vital for professional results. Carefully balancing camera settings, environmental stability, and data management strategies will significantly influence the quality of your final time lapse video. Whether for professional projects or creative pursuits, meticulous planning and execution lay the foundation for compelling visual storytelling.
Understanding Time Lapse Recording
Fundamental Principles of Time Lapse
Time lapse recording involves capturing a sequence of images at set intervals over a period of time and then playing them back at a higher speed to create a video that showcases changes occurring gradually. This technique condenses hours or even days into a few seconds or minutes, revealing processes that are typically too slow for the naked eye. Common subjects include natural phenomena such as cloud movements, plant growth, and sunsets, as well as urban development and event preparations.
To produce compelling time lapse videos, understanding the core principles behind image capture intervals, exposure, and frame rate is essential. These elements directly influence the smoothness, pacing, and overall impact of the final footage. Adequate planning ensures that transitions appear natural and that the viewer can appreciate the evolution of the subject matter without jarring jumps or flickering.
Optimal Scenarios for Time Lapse Recording
- Moving natural scenes—clouds, tides, weather changes
- Construction and cityscape evolution
- Sunrise and sunset sequences
- Event setup or breakdown sequences
- Biological processes, such as plant growth
Each scenario demands specific adjustments in camera settings and interval choices to faithfully represent the passage of time. By mastering the fundamentals of time lapse recording, creators can significantly enhance their storytelling, capturing moments that would otherwise go unnoticed.
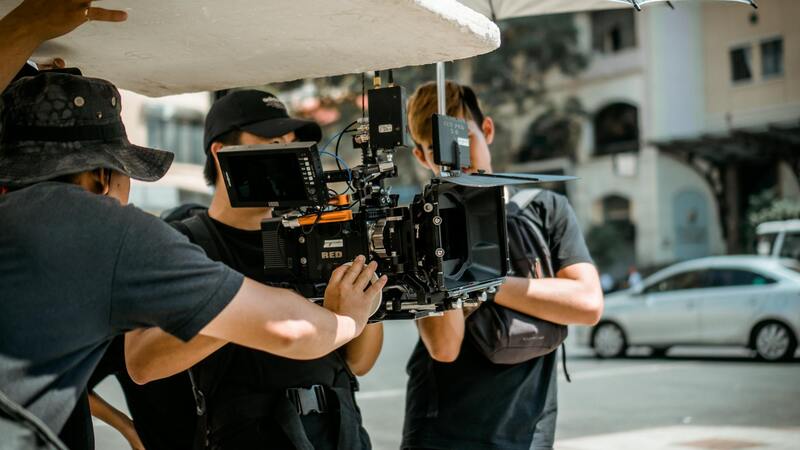
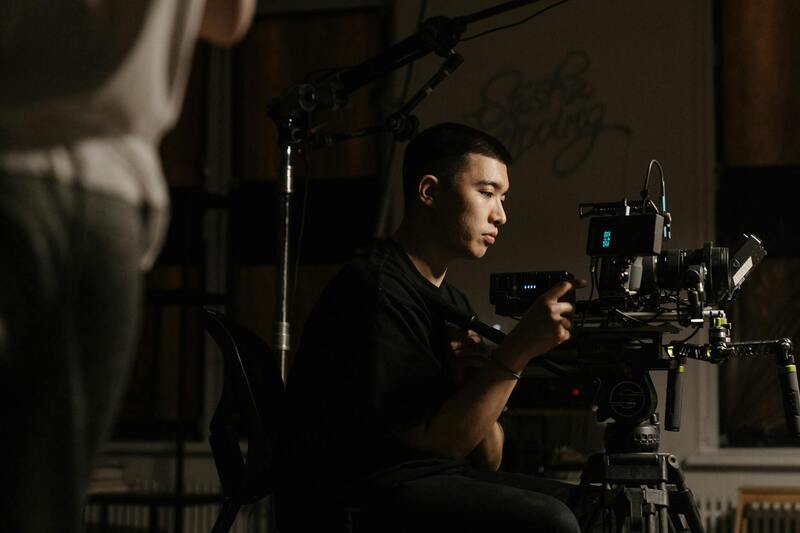
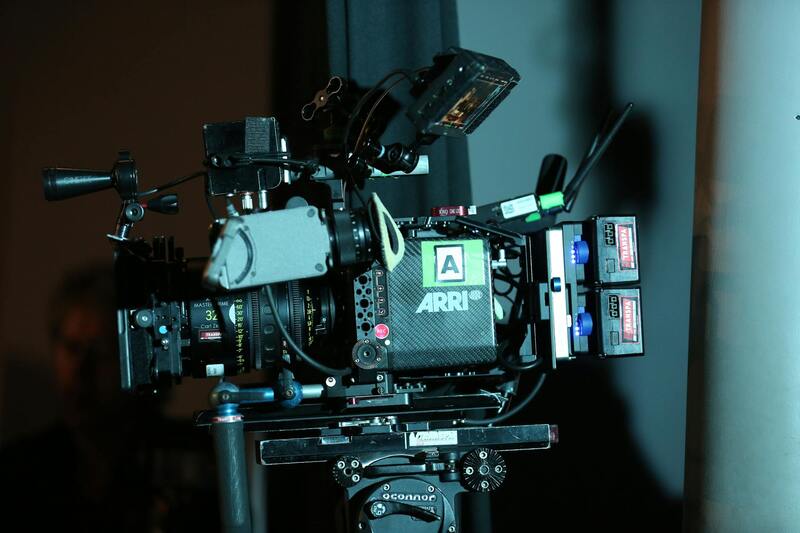
Equipment and Tools for Time Lapse Photography

Primary Hardware Components
- Camera: A DSLR or mirrorless camera with manual controls, capable of capturing high-resolution images and supporting interval shooting modes.
- Intervalometer: A device or software feature that automates the capturing process at predefined intervals, essential for consistency and reliability.
- Tripod and Stabilization Gear: Rigid tripods, fluid head mounts, or vibration dampers keep the camera steady, preventing motion blur and jitters in the final video.
- Power Sources: Spare batteries or external power adapters are necessary for extended shoots to avoid interruptions.
- Memory Cards: High-capacity, fast-writing storage to accommodate the大量的图像数据 accumulated during long recording sessions.
Additional Accessories
- Neutral density filters to control exposure in bright conditions
- Remote camera control apps for adjusting settings and monitoring remotely
- Environmental protection gear, such as weatherproof cases or covers in outdoor settings
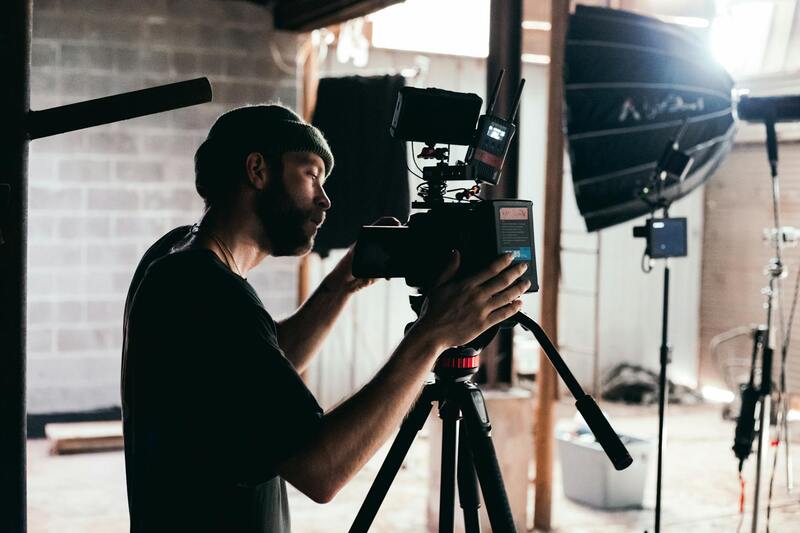
Setting Up for Successful Time Lapse Recording
Preparation is crucial to capturing quality time lapse footage. Begin by choosing a location free from excessive vibrations or disturbances that might affect camera stability. Ensure the scene remains accessible and unobstructed for the duration of the shoot. Once the setup is complete, focus on balancing camera parameters such as aperture, ISO, and shutter speed to optimize image sharpness and exposure throughout the event.
Stabilizing the camera is paramount. Use professional-grade tripods with fluid head mounts and vibration dampers to maintain a steady frame. Additionally, securing the camera against environmental elements—wind, rain, or dust—prevents disruptions. Employing camera control apps can facilitate remote monitoring, allowing real-time adjustments and reducing physical reach to the device during long sessions.
Environmental Considerations
- Monitor weather conditions and prepare protective coverings as necessary.
- Plan for power management, including portable power sources for extended recordings.
- Schedule recordings to avoid periods of excessive lighting fluctuation, such as passing clouds or rapidly changing sunlight.
Configuring Camera Settings for Time Lapse
Accurate configuration of camera settings is key to producing visually appealing time lapse videos. Select manual modes to prevent automatic adjustments that could cause inconsistent exposure. Adjust parameters to suit lighting conditions, ensuring consistent brightness and contrast throughout the shoot.
Maintain a fixed focus, typically set to manual, to prevent focus shifts that can cause flickering in the final footage. Use a narrow aperture to increase depth of field and ensure clarity across the entire scene. Balance ISO settings to minimize noise while capturing enough light, especially in low-light conditions.
The interval between shots is perhaps the most critical choice. It should reflect the speed of the subject's change and the final video’s desired pacing. For slow-moving scenes like sunsets, intervals of several seconds work well, whereas faster changes may require shorter intervals—such as one second or less—to maintain fluid motion. Frame rate settings for the output video, commonly 24 or 30 frames per second, will influence the perceived speed and smoothness of playback.
Capturing and Managing Time Lapse Footage
During the shoot, maintain constant environmental monitoring to minimize variables like sudden changes in lighting or vibrations. Regularly review captured frames to identify potential issues, such as focus drift or exposure inconsistencies, allowing for real-time adjustments if possible.
After capturing, organize images systematically by naming conventions and folders. It’s advisable to create multiple backups—local and cloud-based—to safeguard the substantial data collected. High-resolution images should be reviewed for quality, discarding any frames affected by technical errors. This careful management simplifies the editing process and enhances the final output.
Utilizing dedicated software to compile the image sequence into a continuous video is essential. Adjust the timing, applying stabilization if needed, and add color grading or effects to enhance visual appeal. Export settings should be optimized to preserve image quality, ensuring the final time lapse video appears professional and engaging.
Legal and Ethical Considerations
When engaging in time lapse recording, understanding the boundaries related to permissions and rights is crucial to ensure responsible practice. Recording in private spaces without explicit consent can infringe upon individuals' privacy expectations and lead to disputes. To prevent such issues, always seek permission from property owners or relevant authorities prior to filming in private venues or restricted areas. This not only fosters transparency but also aligns with professional standards.
In public settings, awareness of local regulations and ordinances governing photography and videography is equally important. Some locations may require permits or have specific restrictions on extended recording activities. Ensuring compliance with these guidelines helps avoid unnecessary complications and preserves a positive reputation for your work.
Copyright considerations are another vital aspect of time lapse production. When incorporating elements such as artwork, branded displays, or copyrighted structures, obtaining the necessary rights or licenses is essential. This not only protects against potential legal repercussions but also upholds the integrity of your creative process. Maintaining clear documentation of permissions and rights can streamline the post-production phase and safeguard your work.
- Location Permissions: Always verify whether your intended location requires official authorization for filming, especially for commercial projects or extended shoots.
- Model and Property Releases: For footage that features identifiable individuals or private properties, securing releases ensures clear consent and usage rights.
- Intellectual Property Rights: When using copyrighted materials, seek proper licensing or permissions to avoid infringement issues.
- Environmental and Regulatory Compliance: Certain environments, such as protected natural areas or government properties, may have specific filming guidelines to follow.
Being proactive in understanding and respecting these guidelines enables creators to produce compelling time lapse videos while maintaining legal and ethical standards. Document all permissions obtained, keep copies of authorizations, and be transparent about your project’s purpose with stakeholders involved. This professional approach ensures your time lapse recordings are not only visually stunning but also ethically sound.
Advanced Techniques for Creating Micro-Time Lapses
Beyond standard time lapse recording, developing micro-time lapses can add a compelling layer of depth and detail to your projects. These involve capturing frames at extremely short intervals to document rapid changes within a brief period, often revealing intricate processes not visible to the naked eye. For example, observing the subtle movements of a flower opening or the rapid assembly of a complex machine can create astonishing visual effects.
To achieve successful micro-time lapses, specialized equipment and meticulous planning are required. High-speed cameras with adjustable frame rates are essential, as they allow for precise control over capture intervals. Additionally, stable and vibration-proof mounts are crucial to prevent unwanted movement that could distort the footage. Light management also plays a vital role; using constant lighting ensures consistent exposure, reducing flickering that often plagues high-speed recordings.
Key Tips for Effective Micro-Time Lapse Production
- Plan Your Scene Thoroughly: Understand the process or subject you aim to capture. Break down the sequence and determine optimal intervals for framing changes.
- Use the Right Equipment: Invest in high frame rate cameras and macro lenses to focus on small-scale details with clarity.
- Ensure Consistent Lighting: Employ stable, continuous lighting setups to avoid exposure fluctuations.
- Maintain Camera Stability: Use sturdy tripods or mounts designed for high-speed recording to prevent vibrations.
- Control Environmental Conditions: Conduct shoots in controlled environments to minimize external disturbances such as wind or temperature fluctuations.
Post-Processing Micro-Time Lapses for Maximum Impact
Post-production plays a substantial role in refining micro-time lapse footage. Specialized software allows for frame interpolation, which can smooth transitions and enhance the visual flow of the final video. Color correction and noise reduction are crucial in maintaining clarity and vibrancy, especially when working with macro or microscopic footage. Additionally, selecting appropriate playback speeds can accentuate slow or rapid processes, emphasizing specific movements or transformations.
Integrating Time Lapse Techniques into Larger Projects
Combining standard and micro-time lapse sequences within a single project can create dynamic narratives that showcase both broad transformations and detailed moments. For instance, documenting a construction project with overarching time lapse shots alongside close-up micro-time lapses of individual tasks can provide viewers with a comprehensive understanding of the workflow. When executed seamlessly, these techniques deliver engaging storytelling tools that captivate audiences and highlight the complexity of natural phenomena or industrial processes.
Tip: Experiment with different intervals and playback speeds to find the perfect balance that emphasizes your subject matter and enhances the storytelling aspect of your video.